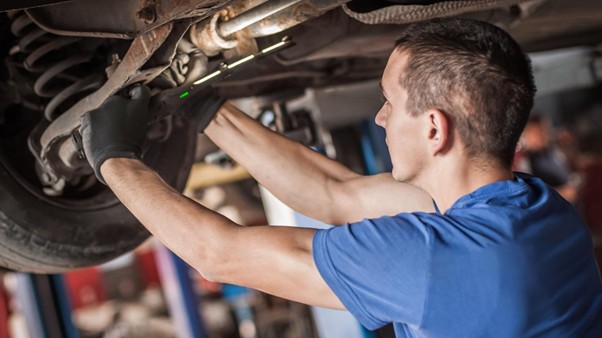
| |

DIY Brake Inspection: A Step-by-Step Guide Every Car Owner Should Know

Sharing is Caring

Your car’s brake system is one of its most critical safety components. Whether you’re navigating city traffic or cruising on the highway, properly functioning brakes ensure you can stop quickly and safely when it matters most. Yet, many drivers overlook routine brake inspections until a problem becomes too obvious—or worse, dangerous.

The good news? You don’t always need to be a professional mechanic to perform a basic brake inspection. With a little time, attention, and the right approach, you can assess the condition of your brakes right at home. This guide walks you through a simple, step-by-step DIY brake inspection process that every car owner should know.

🚗 Why Regular Brake Inspection Matters

Your braking system undergoes constant stress—from heat generated by friction to wear caused by daily driving. Ignoring early warning signs can lead to costly repairs or compromised safety.

Regular brake inspections help you:

  • Detect wear and tear early
  • Prevent expensive repairs down the line
  • Improve braking performance
  • Ensure overall road safety

🧰 Tools You May Need

Before starting, gather a few basic tools:

  • Flashlight
  • Jack and jack stands
  • Lug wrench
  • Gloves
  • Measuring gauge (optional but helpful)

These tools make it easier to inspect hard-to-see components and safely access your wheels.

🔍 Step-by-Step DIY Brake Inspection

1. Start with a Visual Check

Without removing the wheels, you can often get a quick look at your brake components through the rims. Look for:

  • Brake pad thickness (should be more than 3mm)
  • Rotor condition (no deep grooves or scoring)
  • Rust or corrosion on visible parts

If anything looks uneven or excessively worn, it may require closer inspection.

2. Listen for Unusual Noises

Pay attention while driving:

  • Squeaking or squealing may indicate worn brake pads
  • Grinding sounds could mean metal-on-metal contact
  • Clicking noises might suggest loose components

Unusual sounds are often your brake system’s first warning signs.

3. Check Brake Pedal Feel

Your brake pedal should feel firm and responsive. Watch out for:

  • Soft or spongy pedal → possible air in brake lines or fluid issues
  • Vibration or pulsation → potentially warped rotors
  • Delayed braking response → could indicate worn components

A quick test drive in a safe area can help you assess this effectively.

4. Inspect Brake Fluid Level & Condition

Locate the brake fluid reservoir under your hood. Check:

  • Fluid level (should be between “MIN” and “MAX”)
  • Fluid color (clean fluid is light amber; dark fluid may need replacement)

Low or dirty brake fluid can significantly impact braking efficiency.

5. Lift the Car & Remove the Wheels (Advanced Check)

For a more detailed inspection:

  • Safely jack up your vehicle and remove the wheels
  • Inspect brake pads for thickness and even wear
  • Examine rotors for cracks, grooves, or warping
  • Check calipers for leaks or sticking

If you’re not confident performing this step, it’s best to consult a professional.

6. Check for Brake Fluid Leaks

Look around:

Any visible fluid leakage is a serious issue and should be addressed immediately.

7. Monitor Dashboard Warning Lights

Modern vehicles are equipped with brake warning indicators. If you see:

  • Brake warning light
  • ABS light

Don’t ignore them—they often indicate underlying issues that need attention.

When Should You Replace Brake Components?

While inspection helps identify issues, knowing when to replace parts is equally important:

  • Brake Pads: Typically every 30,000–70,000 km depending on driving habits
  • Brake Rotors: Usually last longer but may need resurfacing or replacement with pads
  • Brake Fluid: Recommended every 2–3 years

Driving conditions, terrain, and driving style all influence these timelines.

Pro Tips for Better Brake Health

  • Avoid aggressive braking whenever possible
  • Maintain proper tire pressure
  • Don’t overload your vehicle unnecessarily
  • Schedule periodic professional inspections

Preventive care always costs less than major repairs.

Find Quality Brake Parts at West Can Auto Parts

When it comes to replacing or upgrading your brake components, quality matters. At West Can Auto Parts, you’ll find a wide range of reliable brake products—from premium brake pads and brake rotors to high-performance brake fluids and accessories.

Whether you’re a DIY enthusiast or a professional technician, West Can Auto Parts offers trusted brands and dependable solutions to keep your vehicle safe on the road. With expert support, multiple store locations, and convenient ordering options, maintaining your car’s braking system has never been easier.

Final Thoughts

Performing a DIY brake inspection doesn’t require advanced mechanical skills—just awareness, attention, and consistency. By regularly checking your brake system, you can catch minor issues before they turn into costly repairs or safety hazards.

Make brake inspection a part of your routine vehicle maintenance, and you’ll not only extend the life of your components but also ensure peace of mind every time you hit the road.

Disclaimer:

This blog is for educational and informational purposes only. For accurate diagnosis and proper vehicle repairs, always consult a certified automotive technician.

Similar Posts

Leave a Reply

Your email address will not be published. Required fields are marked *